Showing posts with label Tutorials. Show all posts

Tuesday, February 9, 2016

Pin Cushion!

I've been working on catching up on my quilting. I missed one guild meeting and then went back in January but didn't show anything for Show 'N' Tell. I have a couple things to show at the meeting on Tuesday.

I made a pin cushion inspired by one I saw online using felt hexagons sewn on to a square. It was really challenging with the small pieces but I love how it turned out.
Inspiration:
My Version:

I've also completed a couple table runners. I made a Christmas Bento Box (etsy Shop) for my Mother-in-Law and I made a Christmas Bento Box for myself. They are the same pattern but they look so different.

I'm really going to try and create some paper piecing patterns. I have made a few projects using paper piecing and I find them so fun to try out. The possibilities are endless!

Stay tuned!


Tuesday, October 13, 2015

Quilt Pattern - Elongated Plus Sign

A few months ago, my friend asked me to help her with a quilt pattern. All she had to go on was a picture of one she liked. I tried searching for some kind of pattern that related but I'm sorry to say that Google failed me this time.

I figured I had to make one of my own and it was a lot more time-consuming than I anticipated.

The original picture:

I'll have my version posted in my shop soon. I also have cutting diagrams that come with the pattern!

Friday, September 25, 2015

Bento Box Tutorial

Hosting another Crop and Quilt! So far it's awesome but my feet really hurt. Why can't this concrete/tile floor be made of memory foam?

We had a great meal tonight for the first supper together. We made ham, hashbrown casserole (a favourite!), corn, and Caesar salad. Lots of compliments and it goes over really well!

Anyway, tomorrow I am doing a tutorial on the Bento Box Block. It comes together so easy and so fast! I am going to post the tutorial in my etsy shop soon.


Find the pattern here: https://www.etsy.com/shop/cottonandcooties

Friday, August 28, 2015

Bento Box Table Runner

Hey everyone!

I made something for Mother's Day for my Mother-in-Law and I think I can post it because I'm sure she doesn't read this anyway :).

I was searching for a fun and quick block to do with minimal fabric choices. I was glad when I found the Bento Box Block because it only used 2 fabrics of contrasting colours/patterns. I watched the tutorial from Fons & Porter and they make it really easy to follow. (YouTube Tutorial)

I had minimal fabric to work with so I decreased the size of my pieces (requiring a little bit of math) but I'm glad with how it turned out!
*UPDATE (August 29/15): My mother-in-law loves it and she has requested another one for Christmas!*

Materials for MY (Smaller) Bento Box Table Runner:
Fabric A: 1 fat quarter dark fabric
Fabric B: 1 fat quarter light fabric
Batting: thick batting or thermal batting for the center

Notes:
Cutting for both fabrics will be the same. What you cut for Fabric A, do the same for Fabric B.
Seam allowances for this project are 0.25"

Abbreviations:
FQ - Fat Quarter
RST - Right Sides Together

DIRECTIONS:
CUTTING:

  • Fabric A:
    • Step 1: Cut Fabric into five 2" strips (cut off the shorter side of the FQ). Your strips should be 2" x 18". You should have a larger piece left over. 
    • Step 2: Cut All your strips into the following pieces:
      • Pieces (1) two 2" x 2";
      • Pieces (2) two 2" x 3.5";
      • Pieces (3) one 2" x 5".
  • Fabric B:
    • Repeat Above Cutting Steps
PIECING:
  • Step 1: Take a Piece (1) of Fabric A (dark) and a Piece (1) of Fabric B (light), place RST and sew.
  • Step 2: Take a Piece (2) of Fabric A (dark), place RST and sew.
  • Step 3: Take a Piece (2) of Fabric B (light), place RST along the top edge and sew (see photos Below)


  • Step 4: Take a Piece (3) of Fabric B (light), place right sides together along the right edge and sew (see photo below).
  • Repeat steps 1 through 4 using the opposite colours to make the inverted blocks.

  • You will end up with 10 blocks of both dark-light-dark and light-dark-light (20 blocks total).


  • Take 2 of each block and arrange them into the larger block below. You will alternate having the colours be opposites of each other.


  • Sew the 2 top blocks together.
  • Sew the 2 bottom blocks together.
  • Sew the 2 top and the 2 bottom blocks together.
  • Continue to sew the blocks together in the same manner. ** Be sure to place them in the same order. For example: If you have a light on the top left, it should be on the top left for all 5 of the larger blocks. ** You will get 5 blocks total.


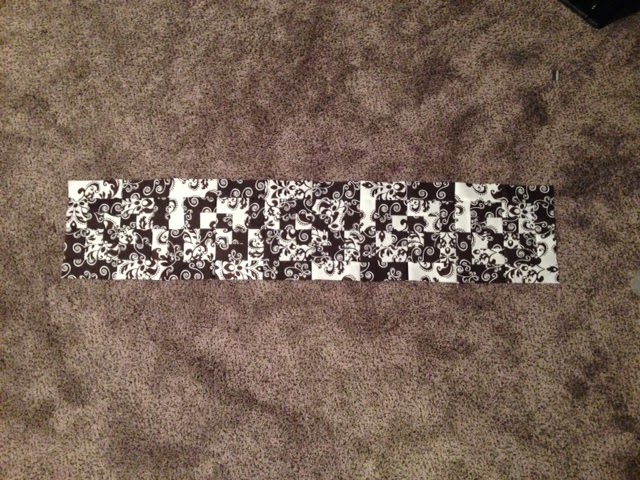
  • Sew the blocks into a line of 5 blocks.


  • I used the rest of my fabric and made the backing. I put the lighter piece in the middle and cut the darker piece in half and put one on each side of the lighter fabric. This just makes sure you have an even backing pattern.
  • Add a thick batting in the middle and quilt as desired.
  • I machine bind my quilts. I use this tutorial by Jenny at the Missouri Star Quilt Company. It is very easy to follow.


  • I attempted to do a stitch that mirrored the swirl pattern on the fabric but it didn't turn out as well as I would have liked so I changed it to a blanket stitch.


Finished Table Runner

I hope this is clear. It's hard to explain but if you watch the Fons & Porter video, it'll help.
Happy Stitching!

Tuesday, September 30, 2014

Mason Jar Tumblers Tutorial

I run a Scrapbooking and Quilting retreat every year in Tilley and I try to give away a few things to the ladies that come. In the past, we've done reusable shopping bags by Baggu, various fabric, organizers, etc. This year, I tried something different.

Mason Jar Tumblers are all the rage recently...

I figured it wouldn't be too hard after watching this tutorial by my new favourite YouTube Channel: The Sorry Girls! (Love that they're Canadian too).

I didn't take photos of the process but I'll do my best to explain how I made 60 (yes SIXTY) of these Mason Jar Tumblers!

Materials:
- Pint-size Mason Jars (I got mine at Walmart and then for fun, I bought some vintage-looking blue ones at Target)
- Grommets (I got mine here)
- Stainless Steel Straws (I got mine here. You can use plastic too. I also bought some fun Paper Straws from Paper Mart just for fun :))
- Drill & Drill Bit (7/16")
- Hammer
- Piece of solid wood (like a short 2-by-4)
- Flat smooth floor (I used my furnace room concrete floor)

HOW I DID IT Instructions:
1) I washed all my jars, jar rims, and straws in my dishwasher on a sanitizing cycle (I didn't wash my lids at the same time).

2) I took my lids to my sister's house and my brother-in-law drilled all the holes. I only gave him the lids. I suggested that he drill them on top of a wood piece (like the YouTube tutorial). He did all the work for me (Thanks a ton!!).

3) Some of the edges of the holes were jagged so I tried to trim them as much as I could but I used tin snips that I read about in another tutorial but they were super awkward to use and didn't work very well at all. I trimmed as much as I could.

4) Trying to make everything as smooth as possible, I decided to take my lids down to my basement, put the lids one-by-one down on the concrete and hit them with my hammer a few times to make everything flat. I couldn't believe it but it worked out great! On my next round, I'm going to try a different bit that my dad said would work well... we'll see :).

5) After the lids were all smooth, I washed these in the dishwasher.

6) When they were all dry, I put in the grommets which was easy once I got in a groove... and after I had done about 10, I was like a pro!

7) I let the ladies choose whether they wanted the bent or straight straws and I let them choose a paper straw for fun.


Any questions??